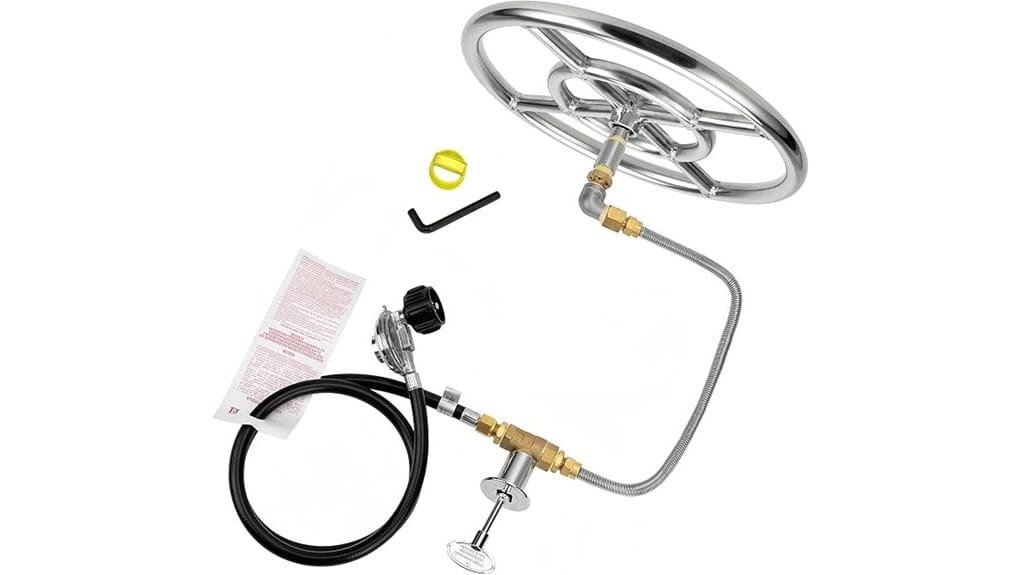

You’ll get a compact 12-inch 304 stainless steel burner ring with a 1/2-inch inlet, air mixer, shut-off valve, fittings, 60-inch flex line and 24-inch pipe—rated up to 90,000 BTU. Installation’s straightforward: seal pipe threads, attach mixer and valve, connect the flexible line, then test for leaks. Flames are even and warm, and you can tune fuel use via the mixer. Expect some surface discoloration over time. Keep going to learn installation tips, performance notes, and alternatives.
Some Key Takeaways
- Compact 12-inch 304 stainless steel burner delivers up to 90,000 BTU with even ring flames and reliable backyard performance.
- Kit includes 1/2″ inlet plug and wrench, air mixer, fittings, shut-off valve, 60″ flexible line, and 24″ threaded pipe.
- Installation requires basic tools, pipe thread sealant, and includes stepwise mounting, air-mixer hookup, and flexible-line connection.
- Routine monthly inspections, seasonal deep cleaning, and stainless-safe cleaners help prevent discoloration, pitting, and debris buildup.
- Best for DIY homeowners wanting high-output propane; consider larger multi-burners or lava-rock kits if you need wider heat spread.
What’s in the 12 Propane Burner Ring Kit and Key Specs
Take a look inside the 12-inch Propane Gas Fire Pit Stainless Steel Burner Ring Installation Kit and you’ll find everything needed to get a basic LP fire pit running: a 12-inch 304 stainless steel round burner with a 1/2-inch female inlet, inlet plug and wrench, air mixer and fittings, a shut-off valve kit, a 60-inch flexible gas line, and a 24-inch threaded pipe. You’ll appreciate clear specs—90,000 BTU max, 304 stainless, 1/2-inch inlet—plus installation tips and a brief safety checklist to follow. Compatibility notes and accessory suggestions help you fit this into your shared outdoor projects. This kit is ideal for homeowners looking to elevate your backyard with a cozy gas fire pit.
How to Install the 12 Stainless Steel Burner Ring (Step‑by‑Step)
Start by confirming you have all kit components and the right tools on hand: the 12″ 304 stainless burner ring, inlet plug and wrench, air mixer and fittings, shut-off valve, 60″ flexible gas line, 24″ threaded pipe, a propane tank or source, pipe thread sealant rated for gas, a screwdriver, adjustable wrench, and a gas leak detector solution. Mount the burner in your fire pit, secure the 24″ pipe to the burner’s 1/2″ inlet with sealant, attach the air mixer and shut-off valve, then connect the flexible line. Tighten fittings, perform safety checks and leak tests. Follow installation tips and share questions with the community. Many homeowners find that choosing quality propane tank accessories can improve safety and functionality, so consider reputable propane tank gear when sourcing parts.
Real‑World Performance: Flame Pattern, Heat Output, and Fuel Use
With the burner secured and fittings checked, you’ll notice how the 12″ stainless ring shapes flame behavior, heat spread, and fuel consumption in real-use settings. You’ll see even flame stability across the ring, creating a consistent, inviting glow that makes guests feel included around the pit. Heat output concentrates outward in a mellow, comfortable band—close warmth without harsh hotspots—so conversations stay cozy. Fuel efficiency is good when you tune the air mixer and valve; you’ll get steady BTU delivery without waste. Together these traits give you predictable performance that fits shared evenings and regular backyard gatherings. This kit is ideal for homeowners looking to elevate backyard outdoor living with a dependable propane fire pit burner.
Durability, Materials, and Common Maintenance Issues
Although 304 stainless steel resists rust and handles high heat, you should expect surface discoloration and occasional scaling over time if the burner sits exposed to weather or frequent temperature cycling. You’ll appreciate the solid construction and modest weight, but plan simple upkeep: check joints, fittings, and the 1/2-inch inlet for debris. For rust prevention, keep connections dry and use stainless-safe cleaners sparingly. Establish a cleaning frequency based on use—light inspections monthly, deeper cleanings seasonally—and store components under cover when idle. Minor pitting or soot won’t hurt performance, but addressing buildup prevents airflow issues and extends service life. Homeowners who enjoy outdoor spaces should consider adding a cover and regular maintenance to preserve functionality and appearance of the unit, especially if the fire pit grill sits in an exposed backyard location.
Who Should Buy This Kit and Alternatives to Consider
If you want a compact, high-output propane burner that’s easy to install and built from 304 stainless steel, this 12-inch FWJ kit is a solid choice—especially if you plan to use it in a covered or semi-protected outdoor setup and can do basic plumbing checks yourself. You should buy it if you’re an outdoor entertainers type who values powerful flames, simple parts, and a modern look without spending much. It also fits budget builders who DIY assemblies and want reliable materials. Alternatives include larger multi-burner rings, lava-rock kits, or integrated tabletop propane units if you need different aesthetics or heat. Consider choosing a regulator that matches your appliance’s required outdoor pressure to ensure safe and consistent performance.
Some Questions Answered
Can This Burner Be Used With Natural Gas (NG) Instead of LP?
No, not without modifications — you’ll need proper conversion kits and different orifice sizes to run NG safely. You’re welcome to convert it, but you should use a certified conversion kit, replace the orifices to NG specs, and follow the manufacturer or a licensed technician’s guidance. Doing this brings you into the community of safe installers; don’t improvise, check local codes, and keep records of the conversion for warranty and inspection.
Is a Regulator Included or Required Separately?
No, a regulator isn’t included; you’ll need to get one separately. You’ll want a regulator compatible with LP and your supply tank, since regulator compatibility affects safe pressure and performance. When you grab installation accessories, include the correct regulator, fittings, and a leak-tested hose. You’ll fit in with other DIYers who prioritize safety, and you’ll feel confident knowing your burner has the proper pressure control and authorized connections before lighting.
Are Lava Rocks or Glass Media Compatible With This Burner?
Yes — you can use lava rock or decorative glass over the burner, but you’ll want to layer them properly and keep the flame ports clear. Use a 1–2 inch lava rock base or a rated fire glass depth per manufacturer guidance, avoid piling directly on the burner holes, and don’t exceed recommended cover depth. You’ll feel confident and included when you follow safety spacing, heat-resistant materials, and proper gas flow recommendations.
What Local Codes or Permits Apply to Installation?
You’ll need to check local permit rules and setback requirements before installing. Many cities require a local permit for outdoor gas appliances, and counties often specify minimum setbacks from structures, property lines, and combustibles. Contact your local building department or fire marshal, review municipal codes, and confirm utility company requirements. You’ll also want to join neighborhood groups for shared guidance so you’re following rules and belonging while staying safe.
Can the Kit Be Installed Vertically or Under Cover?
No — you shouldn’t do a vertical installation or place it in a covered placement without checking safety specifics. You’re part of a community that values safe setups, so follow manufacturer guidance, local codes, and clearances. Use only approved vertical orientation if explicitly allowed, guarantee ventilation, and avoid combustible overheads. If unsure, consult a licensed installer or local authority so you can enjoy your fire pit confidently and safely with others.